VTech Power Vision User Manual
Browse online or download User Manual for Toys & accessories VTech Power Vision. VTech Power Vision User`s manual
- Page / 52
- Table of contents
- BOOKMARKS
Summary of Contents
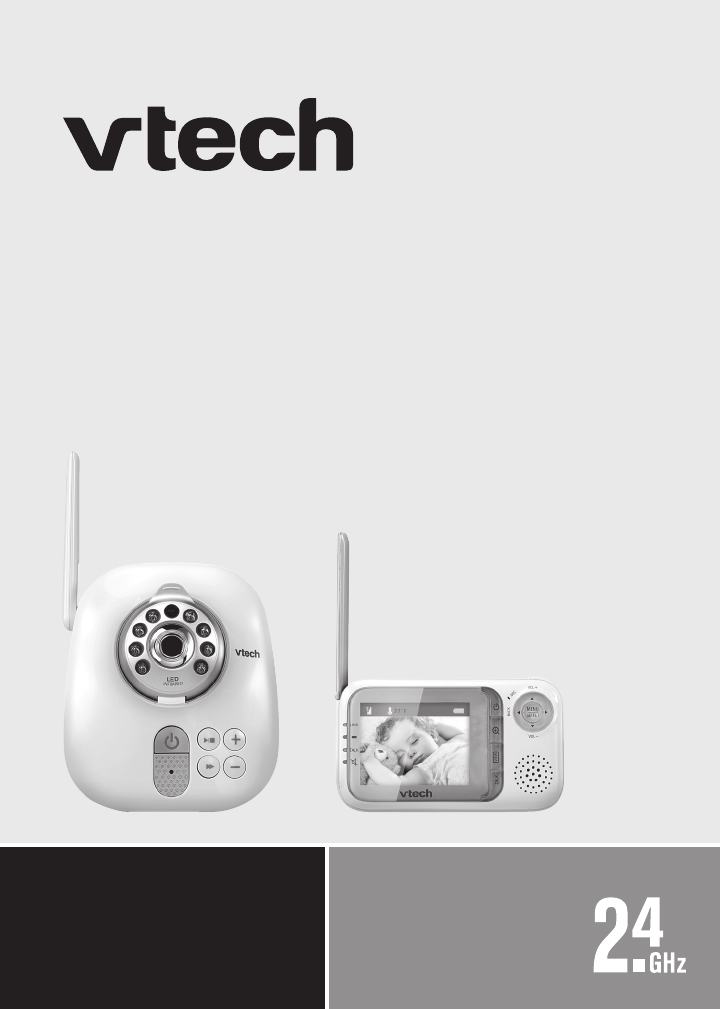
®Safe & SoundTM Video and audio monitorUser’s manualw w w. b a b y m o n i t o r s .v t e c h . c o m Models: VM321/VM321-2
4Getting startedBaby unit installation optionsThe baby unit is ready for tabletop use. Use the provided wall mount if you want to mount it on a wall.
5Getting startedBaby unit installation options (continued)Align the wall mount and screws with the holes in the wall as shown. Make sure to attach the
6Getting startedBundle the power cord neatly with the self-adhesive strap. Make sure to keep the power adapter cord away from children’s reach.5.Baby
7Getting startedOption 2: Use this method so that you can relocate the baby unit with the wall mount easily.Place the wall mount on a wall and then us
8Getting startedBaby unit installation options (continued)Insert the screws into the holes and tighten the screws until only 1/4 inch of the screws ar
9Getting startedBaby unit installation options (continued)Bundle the power cord neatly with the self-adhesive strap. Make sure to keep the power adapt
10Getting startedParent unit battery installationYou can power up the parent unit by connecting it to AC power or to the rechargeable battery provided
11Getting startedParent unit battery installation (continued)To replace the battery, press down on the large tab of the battery and pull it out of the
12Getting startedParent unit installationInstall the parent unit as shown below.Make sure that the power outlet is not controlled by a wall switch. Bu
13Getting startedParent unit battery chargingOnce you have installed the parent unit (see page 12) and its battery (see page 10), press for 2 second
Congratulationson purchasing your new VTech product. Before using this product, please read Important safety instructions on page iii of this manual.
14Getting startedBaby unit overview51234612 13 14151678910111 _ Camera2 _ Infrared LEDsBackup light for night vision (page 29).3 _ (On/off)Press and
15Baby unit lightsGetting started (On/off)On in red when the baby unit is powered by batteries.On in green when the baby unit is powered by AC power.
16Parent unit overview451231210116 7 89Getting started1 _ (On/off)Press and hold to turn on or off (page 30).2 _ (Zoom)While viewing in single-CAM m
17Getting startedParent unit lightsLINKOn when strong signal strength is detected between the parent unit and the selected baby unit.Flashes when the
18Getting startedParent unit display screen iconsConnection status- displays when strong signal strength is detected between the baby unit and the p
19Getting startedPositioning and operating rangePosition the video and audio monitorPlace the parent unit within the operating range (see below) of th
20Getting startedTest your video and audio monitor before useIt is important to test the video and audio monitor when it is installed initially, and a
21Parent unit settingsUsing the menuTo enter the parent unit menu:Press MENU/SELECT when the parent unit is not in use.Press or until the desired
Parent unit settings22Alert tone (continued)No link alertYou can set whether the parent unit beeps whenever the link between the parent unit and the b
Parent unit settings23SensitivityYou can use the parent unit to change the sound sensitivity level of the baby units from Level 1 to Level 5 (Maximum)
Product introductionVM321 is a video and audio monitor which consists of one parent unit (VM321 PU) and one baby unit (VM321 BU).VM321-2 is a video a
Parent unit settings24TemperatureMinimum temperatureYou can set the desired minimum room temperature of the baby unit. The minimum temperature can be
Parent unit settings25Temperature (continued)Temperature alertYou can set whether the parent unit beeps whenever the temperature is out of the preset
Parent unit settings26VibrationYou can set whether the parent unit vibrates whenever there is any sound detected from the baby units. The vibration se
Parent unit settings27Pair/unpair CAMPair new CAMThe baby units and parent unit provided are already paired. You can add or replace baby units (VM301,
Parent unit settings28Pair/unpair CAM (continued)Unpair CAMMake sure you power on the baby unit and the parent unit before unpairing the baby unit.To
29Baby unit operationPower on or off the baby unitPress and hold for 2 seconds to turn on the baby unit. The light turns on.Press and hold for 2
30Power on or off the parent unitPress and hold for 2 seconds to turn on the parent unit. The display screen turns on.Press and hold for 2 seconds
31ViewYou can change the screen to view images from different baby units, or you can turn off the screen.To view different baby units:Press to scrol
32Battery low at CAM #When the baby unit is powered by batteries, the stated baby unit batteries need to be changed. It will be powered off after 30 s
33AppendixParent unit batteryIt takes up to 12 hours for the battery to be fully charged. The standby time varies depending on the sensitivity level y
iiiImportant safety instructionsWhen using your equipment, basic safety precautions should always be followed to reduce the risk of re, electric shoc
34AppendixTroubleshootingIf you have difculty with your video and audio monitor, please try the suggestions below. For customer service, visit our we
35AppendixTroubleshooting (continued)The parent unit plays any sounds from the baby unit and I think it is too noisy.You may have set the sensitivity
36AppendixTroubleshooting (continued)The battery does not charge in the parent unit or the parent unit battery does not accept charge.Make sure the ba
37AppendixTroubleshooting (continued)Common cure for electronic equipment.If the video and audio monitor is not responding normally, try the following
38AppendixOperating rangeThis product operates with the maximum power allowed by the Federal Communications Commission (FCC). Even so, this baby unit
39AppendixPrecautions for users of implanted cardiac pacemakersCardiac pacemakers (applies only to digital cordless devices):Wireless Technology Resea
40AppendixLimited warrantyWhat does this limited warranty cover?The manufacturer of this VTech Product warrants to the holder of a valid proof of purc
41AppendixHow do you get warranty service?To obtain warranty service in the United States of America, visit www.babymonitors.vtech.com or call 1 (800
42AppendixFCC and IC regulationsFCC Part 15This equipment has been tested and found to comply with the requirements for a Class B digital device unde
43AppendixFrequency control Crystal controlled PLL synthesizerTransmit frequency Baby unit: 2402 - 2478.5 MHzParent unit: 2402 -2478.5 MHzChannels 52L
ivImportant safety instructions (continued)To reduce the risk of electric shock, do not disassemble this product, but take it to an authorized service
44IndexAAdd a baby unit 27Alert 21, 22, 25Alert tone 21Audio settings 19BBaby unit battery installation 2Baby unit installation 3Baby unit insta
45IndexSSafety instructions iii–ivScreen icons 18Screen messages 32Self-adhesive strap 3, 12Sensitivity 23Settings 21–28Single-CAM mode 30Sound
91-004422-030-100VTECH TELECOMMUNICATIONS LTD.A member of THE VTECH GROUP OF COMPANIES.Distributed in the U.S.A. by VTech Communications, Inc., Beaver
vTable of contentsGetting started ...1Parts checklist ...1Baby unit battery installation ..
1Important informationParts checklistCheck to make sure the package contains the following items. Save your sales receipt and original packaging in t
2Getting startedBaby unit battery installationYou can power up the baby unit by connecting it to AC power or to four AA alkaline batteries. Even if th
3Getting startedBaby unit installationInstall the baby unit as shown below.Make sure that the power outlet is not controlled by a wall switch. Bundle
Related products and manuals for Toys & accessories VTech Power Vision
 (24 pages)
© 2020, manymanuals.com. All rights reserved. | 2.492 s |
 Manymanuals.com
 Manymanuals.de
 Manymanuals.fr
 Manymanuals.it
 Manymanuals.pl
 Manymanuals.cz
 Manymanuals.es
 Manymanuals-pt.com
Comments to this Manuals